Click Schedule on the Menu Bar at the top of the screen to view published dates and times.
This will open the Screening Schedule page.
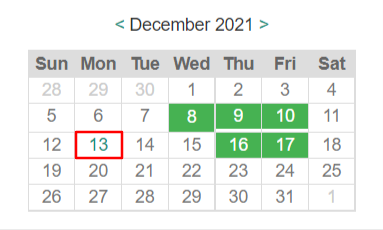
Calendar
You can navigate through the months of the year by clicking on the arrow to the right or left of the Month. Published dates that have no bookings, are denoted by a green block, published dates that are fully booked are denoted by green font and unpublished dates are denoted by black font.
Filters
Filters can be applied to search for schedules related to specific Groups, Locations, Appointment types, Statuses, Stations or health professionals. Once you have selected your criteria, click on Apply Filter to complete the search.
Day Schedule
Status: As Clients/Participants book appointments, the status of an appointment is updated from Free to Booked.
- Time: Provides details of the time and duration of an appointment.
- Type: The appointment type will be either Fasting Bloods, Screening or Follow-up consultation depending on the type of programme created.
- Station Number: When multiple stations are in use, the details of the station number are provided in this column.
- Client Name: Lists the names of clients with Booked or Pre-Assigned appointments.
- Questionnaire: In the Questionnaire column, the
 icon indicates a medical has been created.
  Indicates that the Client questionnaire has been completed
- Due: Indicates if a client has fully paid the amount of their outstanding balance. Hover over the information icon to view full billing details and optional extras.
- Actions: The three dot menu gives access to Add Medical / Start Medical, view appointment details, re-schedule or cancel the appointment, mark as a no show or print the questionnaire.
The article Booking and Assigning Appointments provides further information on booking and managing appointments.